Okay so let’s get this part out of the way. I admire and respect digital artists, but for me there is nothing better than drawing and inking my comics on trade and true bristol paper. Every artist is different so if this isn’t your thing that’s cool, but this post is probably not for you. But if you’re like me, and you like drawing traditionally, then at some point you’re going to need to scan in your comic art and get it ready for print and or coloring. Luckily I have a few handy tips to get you set up and doing just that. Now to be clear I use Adobe products for most all of my resizing/digitizing needs so bear that in mind. However many of these tips should work with just about any decent photo manipulation package.
Before you scan...
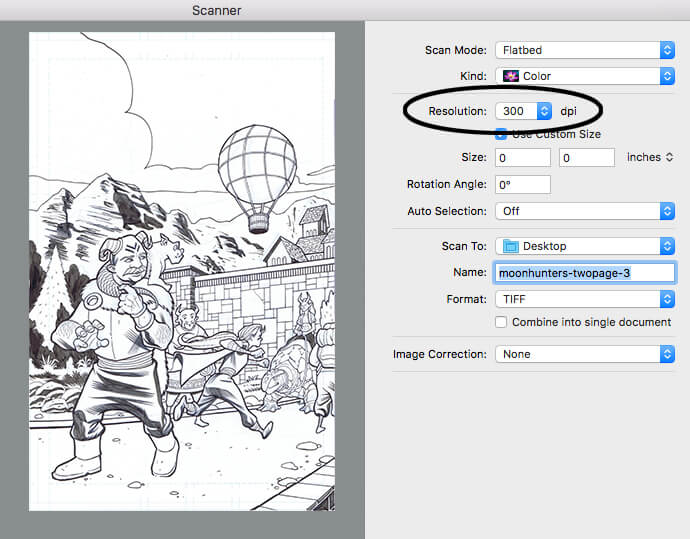
If you have a flat piece of comic art and you don’t have access to some serious photography equipment you’re going to have to scan your art. Your ultimate goal is to have your comic art scanned in at at least 300dpi print size. Wait, stop… I know, I know.. I’m already using words like dpi and print size.. what does it all mean. Okay let’s break it down.
What is dpi? DPI stands for dots per inch. A printer prints in tiny dots. The more dots per inch the crisper the image. A high resolution image therefore has more dots per inch. A low resolution has less. But bear in mind you can always lower the resolution of an image but you cannot increase the resolution and make an image crisper. It’s a one way street.
What is print size? Print size is the size something will print. If we scan comic art at 11×17 and want it to print half size the print size would be 5.5 x 8.5. The print size is the FINAL size of your printed product.
So how do these two work together? Well let’s say you scanned your comic art in at 8.5×11 but scanned it at 72 dpi. If you try to print that, it will print at the right size but the wrong resolution. It will look fuzzy and pixelated. Why? Well because 72 dpi looks great on screen but it’s horrible in print. It’s what monitors are designed for. Printing 72 dots per inch on paper just isn’t enough. To get nice crisp lines and art you have to print at 300 dpi. So for that same 8.5×11 document to print correctly it needs to be scanned in at 8.5×11 at 300 dpi.
Well if 300 dpi is great for printing my comic art what if I scanned at 400 dpi, or 600 dpi? Hey look. If you want to scan at higher dpi you are more than welcome. But here is why I don’t.
It increases your file sizes and takes up space.
It slows down your computer and makes coloring harder if you aren’t using a super fast computer.
Quite frankly it’s unnecessary. Most offset printers can’t print more than 300 dpi. So why put yourself through art headache.
Now that isn’t to say that there aren’t advantages sometimes. For instance if you know a piece might be printed larger down the road (for a poster or something similar) then planning ahead might be good. But I rarely find that is the case. And for large usages such as outdoor billboards or banners that are meant to be seen far away the resolution requirements actually go down. Because the artwork is meant to be seen at a distance typically billboards and the like have much lower resolution requirements since the eye sees those images at a distance as being sharper.
Any scanner/scanning software will have an option to choose your dpi when you scan. Unless you are scanning something specifically for web or to be seen on screen, then I recommend always scanning at least 300dpi. After all you can always reduce the size of something in regards to dpi but never can you upscale it.
Print size is different than dpi but also dependent on it. Print size is basically the size that you want something to print your comic art at. For instance if you want your comic art to print on a standard piece of letter paper, then it’s print size is going to have to be close to 8.5×11.
Here is a handy guide to resolution –
Printing – 300dpi or above.
Web and screen viewing only – 72dpi[/one_half]
Scanning comic art.
Okay so hopefully we’ve got a handle on the basics of scanning comic art. Let’s talk about some of the issues you’ll run into. Most comic art is drawn on 11×17 boards. The typical art size on those boards differs slightly depending on the template you use or per publisher but they are generally set at about 10×15 size. Within that 10×15 size you have about a quarter of an inch on all sides of bleed. But to scan that we’ll need a scanner that can accommodate an 11×17 board. But…
The problem with this is that most people don’t have an 11×17 scanner. So we basically have three options.
- Draw smaller (Say on 8.5×11 boards instead)
- Scan your page in pieces and stitch them together in photoshop
- Find a scanning service that will accommodate 11×17
Now I’m not going to show you how to scan them in pieces if you decide to go that route, as
1. It would be a blog unto itself and
2. It really compromises quality.
Especially with some scanners it can cause so many headaches. So my recommendation is to either draw smaller or find the scanning service. Most Staples and Office Depot stores can scan 11×17 for you. It may cost per scan but if you batch scan (a set of pages all at once) you can get the scanning done much faster. Either that or find someone with a scanner that can accommodate 11×17.
But regardless how you proceed I recommend you scan your comic art IN RGB FULL COLOR at
11×17 at 300 dpi (RGB full color)
or
8.5×11 at 300 dpi. (RGB full color)
Usually i scan at the former just because it’s easier. All I have to do is select my page in my scanning software and my resolution is by default set to 300 every time. You can always change the resolution later for whatever resolution you need.

Things that are important when scanning.
Color – I always scan my comic art in color
Resolution – I always scan at 300 dpi
Format – I always scan as tif (tif compression is lossless, meaning it doesn’t lose information like a jpeg will)
Image Correction – I usually choose none as I adjust in photoshop, which gives me more control
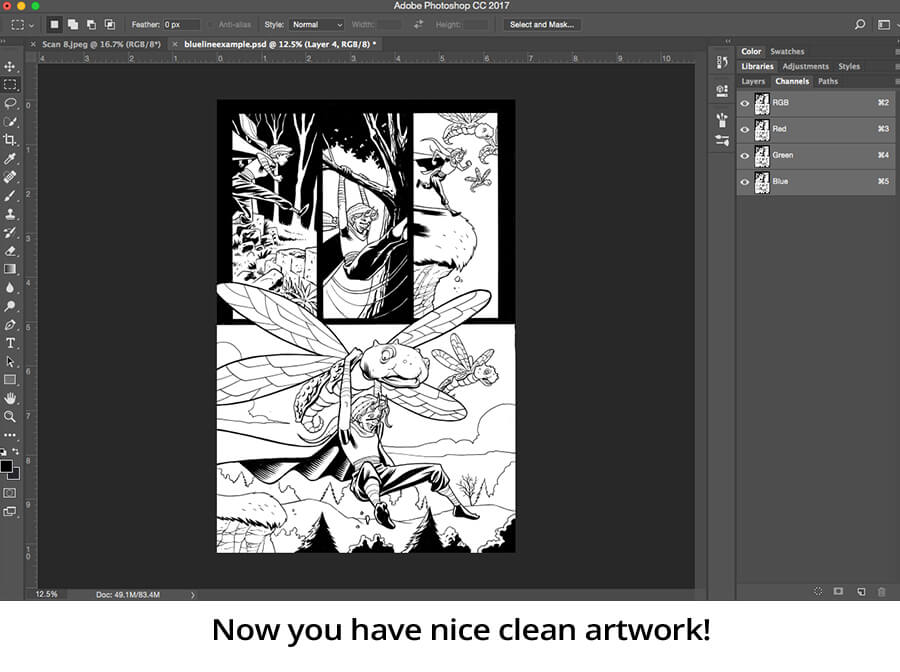
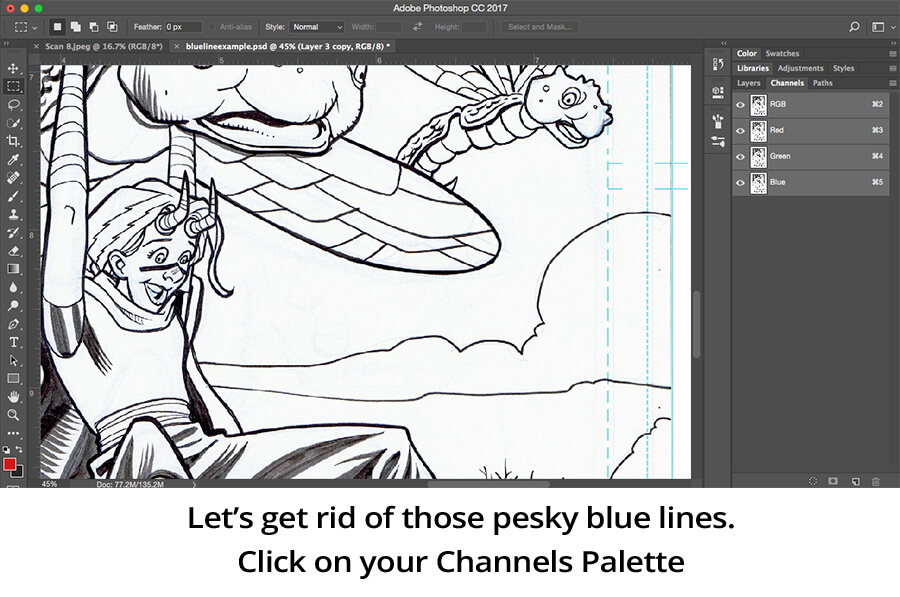
Getting rid of those blue lines and cleaning up the blacks.
At this point we’ve got our artwork scanned and we’re ready to do the dirty work. We’re going to get rid of the pesky blue lines from both the comic board template and from any blue pencils we might have used. We’re also going to clean up those blacks and make sure everything looks good. When you’re done with this step you should have nice looking black and white line art that is either ready for print as is or ready to send to a colorist.
To the right you will see the scanned comic art before it has been adjusted.
Feel free to click on the image to make it bigger and you will see:
- The brush strokes of the the ink.
- The ink isn’t 100% black.
- In some areas you see the blue pencils that weren’t erased fully still show.
- Also this is one image with white and black and putting colors behind the line art would be difficult.
Don’t worry. I’m going to show you how to fix all that in several easy steps.
Blue Lines. Blue Lines Everywhere!
I, like a lot of comic book artists, use blue pencils or blue line pencils when I draw comic art. Also almost every comic template you find uses a blue line template to indicate things like page border, trim marks, bleeds, and sometimes the live area of the comic. We obviously don’t want that to show up in our ready to print comic art so I’ll show you how to get rid of those pesky blue lines.


Darken It Up!
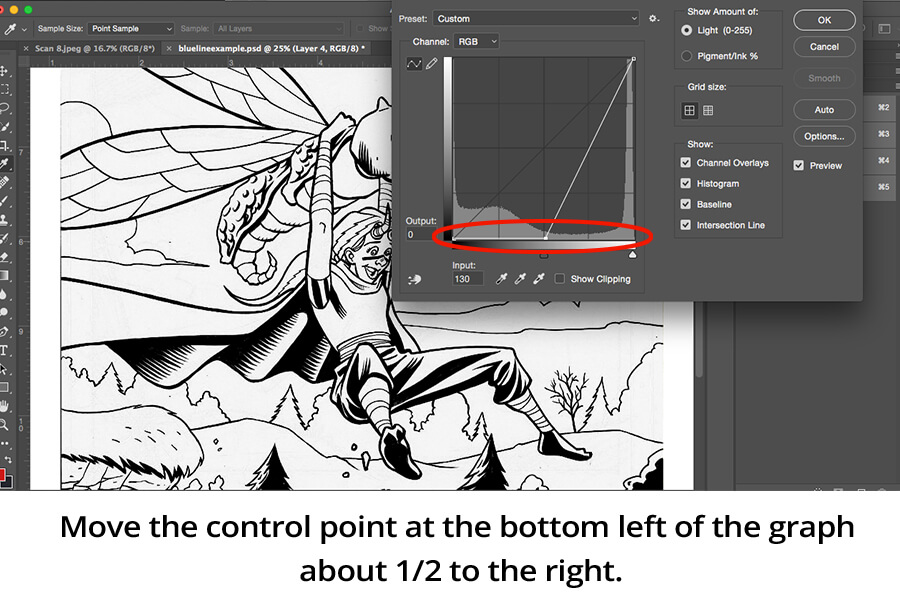

And now your artwork is nice and black. You should then have nice clean artwork.
You can fiddle with the Curves if it’s still not clean enough or if for some reason you still see any pesky light grey lines. But this should do the trick. At this point you can save your file and send it on to your colorist or switch it to Greyscale if you intend on printing your book black and white.